Intel's Current Families of Processors for the Desktop Include Four Major Groups:
This affiliate is from the book
Processors and CPUs
To practise well on A+ Certification exams, you must understand the major types of processors available for recent systems, their technologies, how to install them, and how to troubleshoot them.
Overview of Processor Differences
Although Intel and AMD processors share two common architectures, x86 (used for 32-flake processors and for 64-scrap processors running in 32-bit style) and x64 (an extension of x86 that enables larger files, larger retention sizes, and more complex programs), these processor families differ in many ways from each other, including:
- Different processor sockets
- Different types of microcode
- Differences in dual-cadre, triple-core, and quad-core designs (two or more processor cores help run multiple programs and programs with multiple execution threads more efficiently)
- Enshroud sizes (cache memory stores a re-create of recently-read memory locations to aid improve arrangement operation; L1 cache is in the processor core; L2 and L3 enshroud are in the processor module but exterior the core)
- Performance versus clock speed
Intel Processors
Intel processors developed from 2000 to the present include the following product families:
- Pentium III
- Pentium 4
- Pentium D
- Celeron
- Cadre 2 Duo
- Core 2 Quad
- Core i3
- Core i5
- Core i7
The Pentium III processor was the last Intel processor produced in both a slot-based and socket-based pattern. Slot-based versions use Slot 1, the same slot design used by the Pentium 2 and slot-based Celeron processors. Socketed versions use Socket 370, which is mechanically the same as the socket used by the first socketed Celeron processors. However, some early on Socket 370 motherboards are not electrically compatible with the Pentium Iii.
The Pentium iv replaced the Pentium III and ran at much college clock speeds. Early on versions used Socket 423, a socket used by no other Intel processor. Almost Pentium four designs used Socket 478, while late-model Pentium four designs used Socket 775, which is as well used by current Intel processors. The different sockets used by the Pentium four were necessary because of substantial design changes throughout the processor's lifespan, including the introduction of 64-bit extensions (x64).
The Pentium four's successor was the Pentium D, which is essentially two Pentium 4 processor cores congenital into a unmarried physical processor. Although it used the aforementioned Socket 775 every bit late-model Pentium 4 processors, it required support from different chipsets because data was transferred between processor cores via the Retentiveness Controller Hub (North Bridge) component. The Pentium D was Intel's start dual-core processor. The Pentium Extreme Edition is a faster version of the Pentium D designed for gaming or other high-performance tasks. The Pentium D and Pentium Extreme Edition both support x64 extensions, as does the Core 2 Duo.
The Pentium D was replaced by the Core and Core 2 families of processors. The Core and Core 2 families use processor architectures that emphasize existent-world functioning over clock speed. The first Core 2 processors were the Cadre two Duo (featuring ii processor cores), followed by the Core 2 Quad models (with 4 processor cores). Although Core 2 processors run at much slower clock speeds than the fastest Pentium four or Pentium D processors, they perform much better in real-world operations. Cadre processors are single-core, while Core Duo and Cadre 2 Duo are dual-core. Core, Core Solo, and Core Duo processors are x86 (32-fleck), while Cadre 2 Duo, Quad, and Farthermost processors are x64 (64-bit).
The about recent processors in the Cadre family unit include the Core i7, Core i5, and Core i3, all of which support x64 (64-bit) processing. The Core i7 features quad core or six core designs with Intel HT Engineering science (hyperthreading, which supports two processor threads per core), Intel VT-10 hardware-assisted virtualization, and Intel Turbo Boost overclocking. Core i5 is a simplified version of the Core i7, with only a few dual-core models supporting HT Technology (quad-core Core i5 does not support HT Engineering science); however, all Core i5 desktop processors include VT-x and Turbo Boost and some also include integrated graphics. Core i3 processors are dual-core with back up for HT Applied science, VT-ten, and integrated graphics, merely lack Turbo Heave. Note that mobile processors with these same model numbers differ in some details.
Celeron is really a brand proper noun rather than a specific processor blueprint. Celeron processors have been based on the Pentium II, Pentium III, Pentium iv, and Core 2 processors. Yet, they feature lower clock speeds, slower front side bus speeds (the clock speed of the memory bus), and smaller L2 caches, making them less powerful (and less expensive) processors than the designs they're based on. Very few Celeron models back up x64 extensions.
Because most Intel processor families accept gone through many changes during their lifespans, specific models are sometimes referred to by their code names. In an attempt to make information technology easier to empathize the performance and characteristic differences of models in a particular processor family, Intel has assigned processor numbers to recent versions of the Pentium 4, as well as all more than recent processors.
Table 3-5 provides a brief summary of Intel desktop processors produced from 1998 to mid 2010. For additional details, see Upgrading and Repairing PCs, 19th Edition past Scott Mueller (Que Publishing).
Tabular array 3-5. Intel Desktop Processors from Pentium III through Core i7
| Processor | Lawmaking Names | Clock Speed Range | FSB Speed | Processor Socket or Slot | L2 Cache Sizes | Based On or Notes |
| Pentium 3 | Katmai, Coppermine, Coppermine-T, Tualatin | 450MHz–1.3GHz | 100MHz, 133MHz | Slot ane, Socket 370 | 256KB or 512KB | — |
| Celeron | Coppermine-128, Tualatin 256 | 533MHz–i.4GHz | 66MHz, 100MHz | Slot ane, Socket 370 | 128KB, 256KB | Pentium 3 |
| Pentium 4 | Willamette, Northwood, Prescott, Cedar Mill | 1.4GHz–3.8GHz | 400MHz, 533MHz, 800MHz | Socket 423, Socket 478, Socket 775 | 256KB, 512KB, 1MB, 2MB | — |
| Pentium iv Farthermost Edition | Gallatin, Prescott 2M | iii.2GHz–three.733GHz | 800MHz | Socket 775 | 512KB+2MB L3 or 2MB | Pentium 4 Prescott |
| Celeron | Willamette-128, Northwood-128 | 1.7GHz–2.8GHz | 400MHz | Socket 478 | 128KB | Pentium iv Willamette, Northwood |
| Celeron D | Prescott-256, Cedar Mill-512 | 2.13GHz–three.6GHz | 533MHz | Socket 478, Socket 775 | 256KB, 512KB | Pentium 4 Prescott, Cedar Manufacturing plant |
| Pentium D | Smithfield | 2.66GHz–3.66GHz | 533MHz, 800MHz | Socket 775 | 1MBx2 or 2MB x2 | Dual-core version of Pentium 4 Prescott |
| Pentium Extreme Edition | Smithfield | 3.73GHz | 800MHz | Socket 775 | 2MBx2 | Pentium 4 Prescott |
| Core 2 Duo | Conroe, Wolfdale, Allendale | 1.80GHz–3.33GHz | 800MHz, 1066MHz, 1333MHz | Socket 775 | 2MB, 4MB, 6MB | Dual-cadre version of Core (notebook processor) |
| Core ii Farthermost | Conroe XE | ii.93GHz | 1066MHz | Socket 775 | 4MB | Core two Duo Conroe |
| Celeron | Conroe L | ane.two–ii.2GHz | 800MHz | Socket 775 | 512KB | Single-cadre version of Core 2 Duo Conroe |
| Celeron | Allendale-512 | 1.6–2.4GHz | 800MHz | Socket 775 | 512KB | Core 2 Duo Allendale |
| Core 2 Quad | Kentsfield | 2.4–2.6GHz | 1066MHz | Socket 775 | 4MBx2 | Ii Core 2 Duo Conroe cores |
| Core 2 Quad | Yorkfield | 2.26–3.0GHz | 1333MHz | Socket 775 | 3MBx2, 6MBx2 | Integrated quad-core blueprint |
| Core 2 Farthermost | Kentsfield XE | 2.66–3.0GHz | 1066MHz, 1333MHz | Socket 775 | 4MBx2 | Core 2 Quad Kentsfield |
| Core 2 Farthermost | Yorkfield XE | 3.0–three.2GHz | 1333MHz, 1600MHz | LGA-771 | 6MBx2 | Core ii Quad Yorkfield |
| Core i3 | Clarkdale | two.93–three.33GHz | 1066MHz, 1333MHz | FCLGA-1156 | 4MB | Clarkdale used for Core i3, Cadre i5 |
| Cadre i5 | Clarkdale | 2.4–3.46GHz | 1066MHz, 1333MHz | FCLGA-1156 | 4MB | Clarkdale used for Cadre i3, Core i5 |
| Cadre i7 | Lynnfield, Bloomfield, Gulftown | 2.66–3.2GHz | 800MHz– 1066MHz; 1066MHz– 1333MHz | FCLGA-1156 | 8MB–12MB | Gulftown is a six-core processor; others quad-core |
| Socket 775 is also referred to as LGA-775 considering the socket contains leads that connect with solder balls on the bottom of the processor. | ||||||
| FCLGA-1156 is also known as LGA-1156 | ||||||
| The processor code names and performance in this table are effective every bit of mid 2010. | ||||||
AMD Processors
AMD processors contemporary with the Intel Pentium III and its successors include the following processor families as of mid 2010:
- Athlon
- Duron
- Athlon XP
- Sempron
- Athlon 64
- Athlon 64 FX
- Athlon 64 X2
- Phenom X3
- Phenom X4
- Phenom II X2
- Phenom Ii X3
- Phenom II X4
- Phenom II x6
The Athlon processor was the first (and last) AMD processor produced in a slot-based design. It uses Slot A, which physically resembled Slot 1 used by Intel Pentium II and Pentium Iii models, merely was completely different in its pinout. Later versions of the Athlon switched to Socket A, a 462-pivot socket, which was also used by the Duron, Athlon XP, and Socket A versions of the Sempron.
The Athlon XP replaced the Athlon, and featured college clock speeds and larger L2 cache. The lower-performance analogue of the Athlon and Athlon XP was the Duron, which featured a smaller L2 cache and slower FSB speed.
The Athlon XP blueprint was used for the Socket A versions of the Sempron when AMD moved to 64-bit processing with the introduction of the Athlon 64, AMD's start x64 64-chip desktop processor.
The Athlon 64 family initially used Socket 754, but considering the memory controller is built into the processor, rather than into the Northward Bridge every bit on conventional processors, information technology was necessary to develop a new Socket 939 to support dual-channel retentiveness.
The Athlon 64 FX is a faster functioning–oriented version of the Athlon 64. Initial versions were based on the Opteron workstation and server processor, and thus used Socket 940. Subsequently versions used Socket 939 and its successor, Socket AM2.
AMD'south first dual-core processor was the Athlon 64 X2, which uses a design that permits both processor cores to communicate straight with each other, rather than using the North Bridge (Retentivity Controller Hub) equally in the Intel Pentium D. This enabled upgrades from Socket 939 Athlon 64 to the X2 version after performing a BIOS upgrade.
AMD'southward economy version of the Athlon 64 is also called the Sempron, various versions of which have used Socket 754 and Socket 939.
AMD'south Phenom serial is based on the AMD K10 processor architecture, and all Phenoms include multiple processor cores that are built as a single unit. Phenom Ii is an improved version of Phenom, featuring a smaller procedure, more enshroud, and ameliorate cache management. The Phenom Two series uses a more efficient socket and increases the full possible corporeality of processor cores to 6. Processor speeds are likewise increased in this series. These processors apply a more powerful chipset. The chipset is the main controller of the motherboard. When selecting an AMD processor, the motherboard's chipset should be taken into account to ensure compatibility.
AMD'due south Athlon 2 serial is available in dual-cadre, triple-cadre, quad-core, and six-cadre versions (X2, X3, X4, and X6).
Because nigh AMD processor families have gone through many changes during their lifespans, specific models are sometimes referred to by their lawmaking names.
Table 3-6 provides a brief summary of AMD desktop processors produced over the last decade. For additional details, encounter Upgrading and Repairing PCs, 19th Edition.
Table iii-6. AMD Desktop Processors from Athlon through Phenom II
| Processor | Code Names | Clock Speed Range | FSB Speed | Processor Socket or Slot | L2 Cache Sizes | Based On |
| Athlon | K7, K75, Thunderbird | 500MHz–1.4GHz | 200–266MHz | Slot A, Socket A (aka Socket 462) | 256–512KB | — |
| Athlon XP | Palomino, Thoroughbred, Thorton | ane.333–2.2GHz | 266–400MHz | Socket A | 256–512KB | — |
| Duron | Spitfire, Morgan, Applebred, Appaloosa | 550MHz–1.8GHz | 200–266MHz | Socket A | 64KB | Athlon Socket A |
| Sempron | Thorton, Barton | 1.5–ii.2GHz | 166–200MHz | Socket A | 256KB (Thorton), 512KB (Barton) | Athlon XP |
| Sempron | Paris, Palermo | 1.4–2.0GHz | 800MHz–1GHz | Socket 754 | 128–256KB | Athlon 64 (Socket 754 versions) |
| Athlon 64 | ClawHammer, Newcastle, San Diego, Venice, Orleans | i–2.6GHz | 800MHz–1GHz | Socket 754, Socket 939, Socket 940, Socket AM2 | 512KB–1MB | — |
| Sempron | Palermo | 1.8–ii.0GHz | 800MHz | Socket 939 | 128KB–256KB | Athlon 64 |
| Athlon 64 FX | Run into Athlon 64 code names; also Windsor | 2.ii–two.8GHz | 800MHz–1GHz | Socket 939, Socket 940 | 1MB | Athlon 64 |
| Sempron | Manila, Sparta | 1.six–two.3GHz | 800MHz | Socket AM2 | 128-256-512KB | Athlon 64 |
| Athlon 64 X2 | Manchester, Toledo, Windsor, Brisbane | 1.9–3.2GHz | 1GHz | Socket 939 (Manchester, Toledo), Socket AM2 (Windsor, Brisbane) | 256KBx2; 512KBx2; 1MBx2 | Dual-core version of Athlon 64 |
| Athlon 64 FX | Toledo, Windsor | 2.0–3.2GHz | 1GHz | Socket 939 (Toledo), Socket AM2 (Brisbane) | 1MBx2 | Dual-cadre version of Athlon 64 FX |
| Phenom X4 | Agena | 1.8–2.half dozen GHz | i.6-2GHz | Socket AM2 | 512KBx4 + 2MB L3 | K10 microarchitecture |
| Phenom X3 | Toliman | 2.ane–2.5GHz | 1.6-i.8GHz | Socket AM2 | 512KBx3 + 2MB L3 | K10 microarchitecture |
| Phenom X2 | Kuma | 2.iii–ii.8GHz | 1.8GHz | Socket AM2+ | 512KBx2 + 2MB L3 | K10 microarchitecture |
| Athlon X2 | Kuma | 2.iii–2.8GHz | 1.8GHz | Socket AM2+ | 512KBx2 + 2MB L3 | Phenom X2 |
| Phenom II X2 | Callisto | ii.8–iii.3GHz | 2GHz, two.2GHz | Socket AM3 | 512KBx2 + 6MB L3 | Deneb with ii cores disabled |
| Phenom Two X3 | Heka | 2.4–3.2GHz | 2GHz | Socket AM3 | 512KBx3 +6MB L3 | Deneb with 1 core disabled |
| Phenom II X4 | Deneb | 2.5–three.5GHz | one.8GHz, 2GHz | Socket AM2+, AM3 | 512KBx4 + 4MB or 6MB L3 | DDR3 memory supported on Socket AM3 only |
| Phenom Two X6 | Thuban | 2.seven–3.2GHz | 2GHz | Socket AM3 | 512KBx6 +6MB L3 | Includes Turbo Cadre overclock back up |
| Athlon II | Regor | one.8–2.0GHz | ane.8GHz | Socket AM3 | 1MB | Single-core version of Regor (X2) |
| Athlon Ii | Regor (X2) | 1.half dozen–three.3GHz | 2GHz | Socket AM3 | 512KBx2 or 1024KBx2 | Phenom II without L3 enshroud |
| Athlon 2 | Rana (X3) | 2.ii–three.2GHz | 2GHz | Socket AM3 | 512KBx3 | Phenom II without L3 enshroud |
| Athlon II | Propus (X4) | 2.2–3.1GHz | 2GHz | Socket AM3 | 512KBx4 | Phenom Two without L3 enshroud |
| The processor code names and performance in this tabular array are effective every bit of mid 2010. | ||||||
Processor Sockets and Packaging
Most processors listed in the previous sections use some form of the pin grid array (PGA) bundle, in which pins on the lesser of the processor plug into holes in the processor socket. The exceptions include slot-mounted processors (Slot one and Slot A) and the current LGA and FCLGA sockets, which use a unlike blazon of processor package called the land grid array (LGA). LGA packaging uses gilded pads on the lesser of the processor parcel to connect with raised leads in the processor socket.
Effigy three-21 compares processor packages and sockets to each other.
CPU Technologies
Processor technologies in the following sections might be used by AMD only, by Intel only, or by both vendors. These technologies are used to help distinguish unlike processors from each other in terms of performance or features.
Hyperthreading (HT Technology)
Hyperthreading (HT Technology) is a technology adult by Intel for processing two execution threads within a single processor. Essentially, when HT Technology is enabled in the system BIOS and the processor is running a multithreaded application, the processor is emulating two physical processors. The Pentium 4 was the first desktop processor to support HT Engineering, which Intel offset developed for its Xeon workstation and server processor family unit.
Pentium 4 processors with processor numbers all support HT Engineering science, as do older models with 800MHz FSB and a clock speed of 3.06GHz or higher. HT Technology is likewise incorporated in a number of more recent dual-core, quad-core, and vi-core processors in the Core 2, Core i5, and i7 series to further improve the execution of multithreaded applications.
Dual-Core and Multi-Core
Two or more concrete processors in a organization enable it to perform much faster when multitasking or running multithreaded applications. Even so, systems with multiple processors are very expensive to produce and some operating systems cannot piece of work with multiple processors. Dual core processors, which combine two processor cores into a single physical processor, provide virtually all of the benefits of two concrete processors, and are lower in price and work with any operating organization that supports traditional single-cadre processors.
The kickoff dual-core desktop processors were introduced by Intel (Pentium D) and AMD (Athlon 64 X2) in 2005. Athlon 64 X2's processor cores communicate straight with each other, enabling systems running unmarried-core Athlon 64 processors to swap processors after a simple BIOS upgrade. The Pentium D, on the other paw, required new chipsets to support it. Cadre 2 Duo, Core i3, and some versions of the Core i5 represent major current dual-core processor families. Like the AMD Athlon 64 X2 and newer AMD dual-core processors, these processors' cores communicate direct with each other.
Both Intel and AMD have released processors that include more than than two cores. Intel's Cadre 2 Quad, Core i7, and some versions of the Cadre 2 Farthermost contain four or more processor cores, while AMD's Phenom and Phenom II are available in versions with two, 3, four, or more processor cores.
Processor Throttling
Processors do not need to run at full speed when they have fiddling, or no, work to perform. Past slowing down—or throttling—the processor's clock speed when the workload is light, the processor runs libation, the system uses less energy, and—in the case of mobile systems—the calculator enjoys a longer battery life. Throttling, sometimes referred to every bit thermal throttling, can also take place when a processor gets too hot for the calculator's cooling organization to work properly.
Intel uses the terms SpeedStep or Enhanced SpeedStep for its throttling technologies. AMD uses the term Cool'n'Repose for its throttling technology.
Microcode (MMX)
All Intel and AMD processors in current use include various types of microcode instructions for boosting multimedia operation. The first processor to include this type of microcode was the Pentium MMX, which included 57 new instructions (known as MMX) for working with multimedia. MMX was the beginning instance of what is known as single education, multiple data (SIMD) capability.
Later Intel processors included enhanced versions of MMX known as SSE (MMX+70 additional instructions, introduced with the Pentium Three), SSE2 (MMX+SSE+144 new instructions, introduced with the Pentium 4), SSE3 (MMX+SSE+SSE2+13 new instructions, introduced with the Pentium four Prescott), and, most recently, SSSE3 (MMX+SSE+SSE2+SSE3+32 new instructions, introduced with the Core 2 Duo). The SSE4 instruction set, which adds 51 new instructions, was introduced with the introduction of 45nm processor technology in the Penryn versions of the Core 2 Duo and subsequent processors. SSE4.1 is a subset of SSE4, containing 47 instructions. SSE4.2 includes the seven remaining instructions and was introduced with the Core i7. The term "HD Boost" refers to SSE4 back up.
AMD also provides multimedia-optimized microcode in its processors, starting with 3DNow! (introduced by the K6, which was roughly equivalent to the Pentium MMX). All the same, AMD'southward version differs in details from Intel's, offer 21 new instructions. The AMD Athlon introduced 3DNow! Enhanced (3DNow!+24 new instructions), while the Athlon XP introduced 3DNow! Professional (3DNow!+Enhanced+51). 3DNow! Professional person is equivalent to Intel's SSE. Starting with the Athlon 64 family, AMD now supports SSE2, and information technology added SSE3 back up to the Athlon 64 X2 and newer versions of the Athlon 64 family. AMD also supports four SSE4 instructions as well equally two SSE instructions known equally SSE4a.
Overclocking
Overclocking refers to the do of running a processor or other components, such as memory or the video card's graphics processing unit (GPU) at speeds higher than normal. Overclocking methods used for processors include increasing the clock multiplier or running the front side bus (FSB) at faster speeds than normal. These changes are performed by altering the normal settings in the system BIOS setup for the processor's configuration. Figure 3-22 is a typical BIOS processor configuration screen.
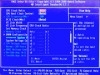
Effigy 3-22 Preparing to overclock a system running an AMD Athlon 64 X2 processor.
About processors feature locked clock multipliers. That is, the clock multiplier frequency cannot be changed. In such cases, the only fashion to overclock the processor is to increase the front side motorcoach speed, which is the speed at which the processor communicates with system retentivity. Increasing the FSB speed can lead to greater system instability than changing the clock multipliers.
Some processors from Intel and AMD feature unlocked clock multipliers, so that the user can choose the best method for overclocking the system. Overclocked processors and other components run hotter than normal, so techniques such as using additional cooling fans, replacing standard active heat sinks with models that feature greater cooling, and adjusting processor voltages are often used to aid maintain organization stability at faster speeds.
Intel'south Core i7, Core i5, and AMD's Phenom II series support automatic overclocking co-ordinate to processor load. Intel refers to this feature equally Turbo Heave, while AMD's term is Turbo Cadre.
Cache
Cache memory, equally mentioned previously, improves system performance by enabling the processor to reuse recently retrieved memory locations without needing to fetch them from main memory. Processors from AMD and Intel characteristic at to the lowest degree two levels of cache:
- Level 1 (L1) cache is congenital into the processor cadre. L1 enshroud is relatively small (8KB–64KB). When the processor needs to access memory information technology checks the contents of L1 cache outset.
- Level 2 (L2) cache is besides built into the processor. On older slot-mounted processors, L2 cache was external to the processor dice, and ran at slower speeds than the processor. On socketed processors, L2 enshroud is congenital into the processor die. If the processor does not notice the desired memory locations in L1 cache, information technology checks L2 enshroud next.
- Level 3 (L3) cache is institute on some very high-performance processors from Intel (such as the Cadre i7 series) and on several high-performance and mid-level processors from AMD. L3 is likewise congenital into the processor die. On systems with L3 cache, the processor checks L3 cache afterwards checking L1 and L2 caches.
If enshroud memory does non contain the desired information, the processor retrieves the desired information from chief retentivity, and stores copies of that data in its cache memory (L1 and L2, or L1, L2, and L3). Processors with larger L2 caches (or L2 and L3 caches) perform most tasks much more quickly than processors that have smaller L2 caches for two reasons. Cache retentiveness is faster than primary memory, and the processor checks enshroud retention for needed information before checking main memory.
VRM
Starting with Socket 7 versions of the Intel Pentium, processors have non received their ability direct from the power supply. Instead, a device called a voltage regulator module (VRM) has been used to reduce 5V or 12V DC power from the ability supply to the appropriate power requested by the processor through its voltage identification (VID) logic.
Although some motherboards feature a removable VRM, most motherboards use a born VRM that is located next to the processor socket, as shown in Effigy 3-23.
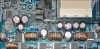
Figure 3-23 A portion of the VRM on an Athlon 64 motherboard.
Speed (Real Versus Actual): Clock Speed Versus Functioning
A mutual measurement of processor performance has been clock speed. However, clock speed tin exist misleading. For example, the Intel Core 2 Duo and AMD Athlon 64 X2 processors perform computing tasks much more speedily than the Pentium D, fifty-fifty though the Pentium D runs at a much higher clock speed.
To determine the actual performance of a processor, yous should utilise benchmark tests such every bit Futuremark's SYSmark, PCMark, and 3DMark.
32-flake Versus 64-fleck
Processors adult before the AMD Athlon 64 were designed only for 32-flake operating systems and applications. 32-fleck software cannot admission more than 4GB of RAM (in fact, 32-bit Windows programs tin can use only 3.25GB of RAM), which makes working with large information files difficult, as just a portion of a file larger than the maximum memory size can be loaded into retention at one fourth dimension.
The Athlon 64 was the showtime desktop processor to support 64-flake extensions to the 32-scrap x86 compages. These 64-bit extensions, commonly known as x64, enable processors to apply more than 4GB of RAM and run 64-fleck operating systems, but maintain full compatibility with 32-fleck operating systems and applications.
Late-model Pentium 4 processors from Intel also support x64, every bit practise subsequent processors such as the Pentium 4 Extreme Edition, Pentium D, Pentium Extreme Edition, Cadre 2 Duo, Core 2 Quad, Cadre 2 Farthermost, Core i3, Cadre i5, and Core i7. Subsequent AMD processors including the Athlon X2, Athlon Two, Phenom, and Phenom II also support x64. Most processors made today support x64 operation.
Choosing the Best Processor for the Job
If you are ownership or building a new organisation, y'all have free rein in the choice of a processor to build the system effectually. This department describes of import considerations.
Functioning
If you need a system that can handle high-resolution graphics and video, and can perform heavy-duty number crunching, get the fastest dual-core or multi-core processor you can beget. However, if your requirements are less extreme, you can salve money for your clients past opting for a processor from the same family unit with slower clock speed or less cache memory.
Thermal Issues
Many processor models are available in 2 or more versions that differ in their thermal requirements; that is, the type of active heat sink necessary to cool them and the amount of power (in watts) needed to operate them. This figure is often referred to as Max TDP (maximum thermal pattern power). In a mid-tower or full tower system, these considerations might be less important than in a micro-tower or small grade factor system, or a system that might need to run as quietly equally possible.
32-flake Versus 64-chip (x64) Compatibility
Unless you are trying to build the least-expensive system possible, you will find information technology difficult to find 32-bit just processors today. However, if you are repurposing existing systems, you might need to determine which systems include processors with support for 64-flake operation, and which support only 32-bit operation.
Other Processor Features
Processor features such equally NX (no execute, which provides hardware-based protection against some types of viruses and malware) and hardware-based virtualization (which enables a single processor to be split into multiple virtual machines with petty or no slowdown) are also important to consider in business environments. Check the specification sheets provided past processor vendors to determine the verbal features supported by a particular processor.
Installing Processors
Processors are i of the most expensive components found in any computer. Because a processor tin fail, or more likely, might need to be replaced with a faster model, knowing how to install and remove processors is important. On the A+ Certification exams, you should be prepared to answer questions related to the condom removal and replacement of socketed processors.
The methods used for CPU removal vary co-ordinate to two factors: the processor blazon and the socket/slot type.
As you saw in Tables iii-5 and iii-6, most recent processors are socketed. Earlier the development of the ZIF socket, the processor was held in place by tension on the chip's legs, pins, or leads. Thus, to remove these chips, you must pull the chip out of the socket. Because the chip's legs, pins, or leads are delicate, special tools are strongly recommended for removing fries that are non mounted in ZIF sockets.
Before removing and installing any CPU or other internal component, exist sure to review and follow the ESD precautions discussed in Chapter 17.
Removing the Heat Sink
ZIF sockets are used on about all desktop systems using Pentium III-course or newer socketed processors (except for processors using LGA sockets). They let easy installation and removal of the processor.
What makes ZIF sockets easy to work with? They have a lever that, when released, loosens a clamp that holds the processor in place.
If the processor has a removable heat sink, fan, or thermal duct that is attached to the motherboard, you must remove these components before you can remove the processor.
Rut sinks used on Socket 370 and Socket A processors have a jump-loaded clip on one side and a fixed lug on the other side. To release this clip, press down on it using a screwdriver, as shown in Figure 3-24.
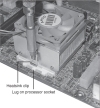
Effigy 3-24 Releasing the bound clip on a Socket A processor'due south rut sink.
Most newer processors utilise estrus sinks that are attached to a frame around the processor or are mounted through the motherboard. To release these oestrus sinks, yous might need to flip up a lever on ane side of the heat sink or release the locking pins. Figure three-25 illustrates a typical installation on an Athlon 64 processor, and Figure 3-26 illustrates the components of a typical estrus sink for LGA 775 processors.
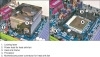
Figure three-25 Typical heat sink associates on Athlon 64 processor.
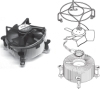
Figure 3-26 Stock heat sink assembly for Intel Core two Duo LGA 775 processor.
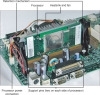
BTX systems employ a horizontally mounted thermal module that is equipped with a fan. The thermal module as well helps cool other components such every bit the motherboard chipset and memory. Figure 3-27 illustrates a typical thermal module installed on a motherboard. Notation that the forepart of the thermal module extends below the edge of the motherboard to provide cooling for both top and bottom.
To remove a thermal module from a BTX motherboard, follow these steps:
- Stride one.Remove the screws that attach the module to the retention bracket on the underside of the motherboard.
- Footstep two.Disconnect the thermal module's fan power atomic number 82.
- Step 3.Lift the thermal module off the processor.
Be careful when removing caput sinks or thermal modules. Exist careful non to drop the rut sink or thermal module on the CPU or on the motherboard. Rut sinks and thermal modules are bulky and heavy and can easily damage the expensive parts of the your computer.
Removing the Processor
Subsequently removing the heat sink, follow these instructions to consummate the processor removal procedure.
- Pace 1.Disconnect the active heat sink (if included) from its ability source and lift the assembly away.
- Step 2.Push button the lever on the ZIF socket slightly to the exterior of the socket to release it.
- Pace 3.Lift the end of the lever until it is vertical (see Figure three-28). This releases the clamping mechanism on the processor'south pins.
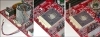
Figure 3-28 After the oestrus sink fan is disconnected from power (left) to reveal the processor (centre), the lever on the ZIF socket (right) can be lifted to release the processor.
- Pace 4.Grasp the processor on reverse sides, making sure not to affect the pins, and remove it from the socket. Put it into antistatic packaging.
The process of removing an LGA-based processor is a bit different:
- Footstep one.Disconnect the active heat sink (if included) from its power source and elevator the assembly away.
- Step 2.Lift the locking lever to release the load plate, which holds the processor in identify.
- Step three.Carefully lift the processor away and place in into antistatic packaging.
Be careful when removing the processor and when unlocking any sockets. These components are very fragile. Think of yourself as a watchmaker when dealing with these parts!
Installing a New Processor
Before installing a new processor, verify that the processor you plan to install is supported by the motherboard. Even though a detail combination of processor and motherboard might use the same socket, issues such equally BIOS, voltage, retention support, or chipset considerations can forestall some processors from working on item motherboards. Yous tin can destroy a processor or motherboard if you install a processor not suitable for a detail motherboard.
After verifying compatibility past checking the system or processor manual (and installing any BIOS updates required for processor compatibility), cheque a PGA-blazon processor for bent pins, and the socket of an LGA processor for bent leads. Correct these problems before continuing.
To insert a PGA-type CPU into a ZIF socket, observe the corner of the flake that is marked as pivot 1 (usually with a dot or triangle). The underside of some chips might exist marked with a line pointing toward pin ane. Then follow these steps:
- Step 1.Line upwardly the pivot ane corner with the corner of the socket also indicated as pivot one (look for an arrow or other mark on the motherboard). If you put the bit in with pin i aligned with the wrong corner and apply the power, you will destroy the chip.
- Step 2.Make sure the lever on the ZIF socket is vertical; insert the CPU into the socket and verify that the pins are fitting into the correct socket holes.
- Step 3.Lower the lever to the horizontal position and snap it into place to secure the CPU.
- Step 4.Before attaching the heat sink or fan, decide if the oestrus sink has a thermal pad (as well called a phase-change pad) or if you need to apply thermal compound to the processor cadre (refer to Figure 3-27). Remove the protective tape from the thermal pad or use thermal compound equally needed. Attach the heat sink or fan. You must use some type of thermal compound between the processor and the bottom of the heat sink.
- Step 5.Adhere the estrus sink to the processor every bit directed by the processor vendor (for rut sinks supplied with the processor) or oestrus sink vendor (for aftermarket estrus sinks). In some cases, you might need to attach mounting hardware to the motherboard before yous can adhere the heat sink.
- Step 6.If you are installing an active oestrus sink (a heat sink with a fan), plug the fan into the appropriate connector on the motherboard.
To insert an LGA processor, locate the notches on each side of the processor. These stand for with fundamental tabs in the processor socket. Then follow these steps:
- Pace i.Make sure the load plate assembly is completely open. It has a plastic embrace that can be removed at the end of Pace v.
- Step 2.Line upwards the notches in the processor with the primal tabs in the processor socket. This assures that the processor's Pin 1 is properly aligned with the socket.
- Step 3.Lower the processor into place, making sure the metallic heat spreader plate faces upwardly and the gold pads face down. Do non driblet the processor, as the lands in the processor socket could be damaged.
- Step 4.Button downwards the load plate and shut the load plate assembly cam lever.
- Step 5.Lock the lever in place on the side of the socket. Remove the plastic comprehend and save it for future use.
- Step half dozen.Before attaching the oestrus sink or fan, determine if the heat sink has a thermal pad (also chosen a phase-alter pad) or if y'all demand to employ thermal compound to the processor core (refer to Figure 3-27). Remove the protective record from the thermal pad or utilise thermal compound as needed. Attach the heat sink or fan. You must use some blazon of thermal compound between the processor and the lesser of the oestrus sink.
- Step seven.Attach the heat sink to the processor equally directed by the processor vendor (for heat sinks supplied with the processor) or heat sink vendor (for aftermarket heat sinks). In some cases, you might need to adhere mounting hardware to the motherboard before yous can attach the heat sink.
- Stride eight.If you are installing an active heat sink (a heat sink with a fan), plug the fan into the appropriate connector on the motherboard.
Check the processor installation by booting the computer and by checking the speed of the processor in the BIOS and in Windows.
Slot-Type CPU (early on Pentium III, early AMD Athlon, and Others)
You won't meet many slot-type CPUs anymore, but if you need to install 1 on a motherboard, make sure the motherboard has a retention mechanism fastened. If the motherboard doesn't have i, you lot will need to remove the motherboard from the example to adhere a retention machinery if it is non already attached.
To remove a slot-type CPU, follow these steps:
- Footstep 1.Button downward on the retainers at each terminate of the CPU to release the CPU from the memory mechanism.
- Stride 2.Disconnect the power lead to the CPU fan (if present).
- Step 3.Remove the CPU and fan/heat sink from the memory mechanism. The CPU slides straight up from the slot.
To adhere a slot-type CPU, follow these steps
-
Pace i.Attach the CPU retentivity mechanism to the motherboard. Leave the foam backing on the lesser of the motherboard while pushing the supports into place. Lift up the motherboard and secure the retention mechanism with the screws supplied.
Some motherboards are shipped with the memory mechanism already installed, and so this step might not utilise to you. If the retention mechanism is folded against the motherboard, unfold it so the supports stand straight up.
- Step ii.Adhere the fan and heat sink to the CPU if it is not already attached; some CPUs have a factory-attached heat sink/fan, whereas others crave you to add it in the field.
- Footstep 3.Match the pinouts on the bottom of the CPU to the motherboard'southward slot; notation that the slot has two sides of unequal length, making it easy to match the slot with the CPU.
- Step 4.Insert the CPU into the retentiveness mechanism; push down until the retaining clips lock the CPU into place. Figure 3-29 shows the CPU in identify.
Effigy 3-29 A Slot 1–based Celeron CPU after installation. The heat sink and fan are attached to the rear of the CPU.
- Stride 5.Connect the ability lead from the fan (if nowadays) to the motherboard or drive power connector every bit directed.
Troubleshooting Processors
Keeping the processor running reliably is vital to correct organization operation. This section focuses on some mutual issues and solutions.
Organization Runs Slower Than Rated Speed
A organization running slower than its rated speed might exercise so because of processor throttling due to overheating, less than optimal settings in the Windows Ability Options in Control Panel, or because of incorrect BIOS timing.
Overheating of the Processor or System
A system that overheats will finish operating, and with some older processors serious impairment can result. Well-nigh processors today are fitted with active rut sinks that contain a fan. If the fan stops working, the process will overheat.
Fan Failure
Estrus sink fans don't have to stop turning to fail; if they plough more than slowly than they are specified to run, they tin cause processor overheating.
Fan failures tin can be acquired by clay in the fan, worn-out bearings, or a bad connection to the motherboard or bulldoze-cable power. In most cases, it's better to replace the heat sink fan than to try to clean information technology. If you must clean it, follow these steps:
- Pace 1.Remove the oestrus sink from the CPU.
- Step 2.Place it on a surface covered with old newspapers or waste paper.
- Footstep three.Blow it out with compressed air.
Before reattaching the heat sink, clean the old thermal textile from the processor and the estrus sink and reapply a minor amount of thermal material to the elevation center of the processor cap. For specific thermal fabric installation recommendations for a particular processor, check the processor manufacturer'due south website.
If you opt for a replacement fan, improve reliability and life past specifying a ball-begetting fan rather than the typical (and cheap) sleeve-bearing units. Overheating tin can besides be caused past a dirty ability supply or case fan, or by missing slot covers. Make clean or replace the fans, and replace the slot covers. Don't overlook cleaning out the inside of the instance, because a dirty case interior will eventually clog other components due to the system's airflow.
Incorrect Heat Sink for Processor Type/Speed
If the processor overheats and the heat sink is properly attached and the fan is running, make certain the heat sink is designed for the processor type and speed in use. Heat sinks fabricated for lower speed processors might not provide adequate cooling for faster processors, which often run at higher temperatures.
Use the heat sink provided by the processor vendor, or, if you are using a separately purchased heat sink, make sure the heat sink is designed for the processor type and speed in utilize.
The hardware monitor feature in the organization BIOS can warn of overheating or fan failure. This is most constructive if the motherboard or system vendor'due south monitoring software is likewise installed and then yous can be warned of problems while Windows is running.
Windows Power Options in Control Panel
Computers which are configured to use power settings other than High Operation will run more slowly at times to aid save ability and reduce heat. Systems using settings other than High Performance might also get into sleep way more than apace, which can reduce system responsiveness. For maximum performance, use the High Performance power management setting (known as power scheme in some versions of Windows). Note that some older laptop computers use a special keystroke to activate or manage proprietary ability management software.
Underclocked Organisation
Some systems revert to a "fail-safe" setting in which the CPU frequency and/or clock multiplier default to depression-speed settings if the system fails to boot properly or is shut off earlier starting. Bank check the system speed reported on the System properties sheet in Windows XP/Vista/7 or the CPU frequency/multiplier values in the BIOS. If these values are incorrect, set the CPU frequency and multiplier values co-ordinate to the processor manufacturer's guidelines. Come across Affiliate iv for details.
If the system is configured to automatically detect the correct values for CPU frequency and clock multiplier only volition not report the right speed, the arrangement might need a BIOS upgrade to properly support the processor, or you might be using a remarked processor (ane that has had its original model number and technical information contradistinct to make it appear as if it's a faster processor).
Processor Failure
If the processor is non locked into place, you lot will not be able to adhere the heat sink. Never run the organisation if the processor is not properly installed, including estrus sink installation.
Source: https://www.pearsonitcertification.com/articles/article.aspx?p=1681755&seqNum=3
0 Response to "Intel's Current Families of Processors for the Desktop Include Four Major Groups:"
Post a Comment